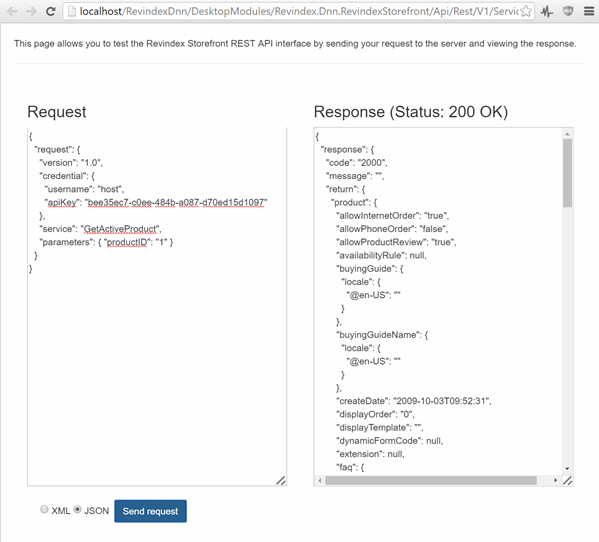
You must first enable the API feature under Configuration > General to access this functionality. Once enabled, you can login as host superuser to access the Configuration > API menu to generate your API keys.
You will also need some basic understanding of how the API service uses XML/JSON and the HTTP protocol to transmit data.
HTTP Transmission
The API service uses Internet HTTP protocol to transmit data like ordinary Web pages. However, it will only accept POST method calls similar to form submissions by a Web page. If a GET request is received (such as navigating directly to the URL of the API service from the Web browser), the API service will return a useful HTML page that you can use, in turn, to send a simple POST request for quick tries (any request made here will affect your environment's data).

Because it uses the same HTTP protocol as your Web site, it follows that the same timeout and server limitations apply to the API service as they do to your Web site. You may want to consider changing the default request timeout for your API call if you expect to initiate a long running request.
For security purposes, it is recommended to use the API service on a HTTPS (SSL) URL address to encrypt your transmissions.
XML or JSON Format
XML and JSON are simply encoding formats used to transmit the data. Both formats are interchangeable. By default, the REST API will communicate using XML. To communicate using JSON, you need to pass the "Content-type: application/json" in your HTTP request header. Throughout this documentation, we'll simply refer the data in XML, but you can expect the equivalent notation is available in JSON.
Request
The API service expects to receive a HTTP posted data in properly formatted XML or JSON for each method call. Any XML/JSON reserved characters must be properly encoded. A typical request will consist of the following nodes:
| Node |
Required |
Data Type |
Description |
| request |
Yes |
XML |
Root node. |
| version |
Yes |
Decimal |
Indicates the API version. Currently, you should specify "1.0". |
| credential |
Yes |
XML |
|
| username |
Yes |
String |
API username. |
| apiKey |
Yes |
String |
API Key. |
| service |
Yes |
String |
Any valid supported service name (e.g. "GetActiveProduct") |
| parameters |
Yes |
XML |
|
| param1... |
Conditional |
|
Parameter as required by the service being invoked. |
| param2... |
Conditional |
|
Parameter as required by the service being invoked. |
Response
After submitting a request, you can expect to receive a typical HTTP status code response (200 OK, 403 Forbidden, etc.) as you would expect in normal Web requests. The common HTTP status codes are noted below. For a complete list, please consult the W3.org web site. The first verification is to ensure you are receiving the 200 OK status to ensure you are at least successfully communicating with the API service over the network.
| Status Code |
Description |
| 200 |
OK |
| 400 |
Bad request |
| 401 |
Unauthorized |
| 403 |
Forbidden |
If the operation succeeded, you can expect to receive the response data in XML format. A typical XML response will consist of the following nodes below.
| Node |
Data Type |
Description |
| response |
XML |
Root node |
| code |
Integer |
The service response code indicating success or failure. |
| message |
String |
The success or failure message. |
| return |
XML |
Any data being returned is stored underneath this node. |
| data1... |
|
Actual data being returned, if any. |
| data2... |
|
Actual data being returned, if any. |
The following table lists the possible service response codes returned in the XML/JSON. It is important to verify the response for the 2000 Success code to ensure there are no errors.
| Code |
Description |
| 2000 |
Success |
| 4001 |
XML Parsing error |
| 4002 |
Authentication error |
| 4003 |
Service execution error. |
| 4004 |
Service not found. |
| 4005 |
Access permission error. |
| 4006 |
Validation error. |