We do our best to keep base templates available and backward compatible for many years, but as time passes, some very old base display templates may be removed from newer installation. Therefore, any custom display templates referencing the older base display templates or models that are outdated, may or may not work as expected. We recommend that you keep your custom templates up-to-date.
The Storefront comes with a basic online code merge editor to help compare line differences. You may want to employ a 3rd party merge editor like WinMerge if you're more comfortable merging from a desktop application instead of performing the merge online.
There are several ways you can upgrade your display template (merge changes into a new template or merge changes to an existing template). Merging changes to a new display template is a safer approach if you are not keeping backups because it allows you to incrementally make small changes and test your new template without affecting your original custom display template.
Merge changes to a new display template
- Navigate to the Configuration > Display templates menu.
- Create new custom display template of the same module control type that you want to upgrade.
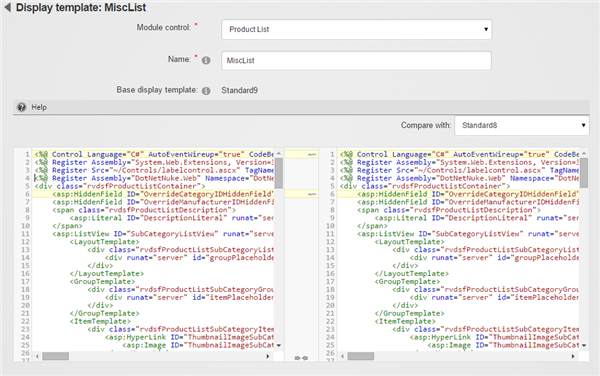
- Give it a name (e.g. "CustomTemplate2") and make sure you select the latest base display template with the highest suffix number (e.g. "Standard8" or "StandardSingleStep").
- In the Compare with drop down, choose your old custom display template that you want to upgrade from (e.g. "CustomTemplate1"). The left textarea should now show your new display template and the right textarea should show your old custom display template.
- Look for your line changes and click on the left wiggly arrows to merge only the lines that you want to affect into the new display template (right to left). Merging code requires careful attention to details. Failure to understand what each line does may break the structure of the code. In this case, you're looking for code changes you made to the old display template and your goal is to replicate those changes into the new display template.
- Save your new display template.
- Go to your configuration settings to set the respective module control to use your new custom display template.
- Once everything is tested. You can now delete the old custom display template.
Merge changes to an existing display template
- Navigate to the Configuration > Display templates menu.
- Select your custom display template (e.g. "CustomTemplate1") that you want to upgrade.
- In the Compare with drop down, choose the newest base template with the highest suffix number (e.g. "Standard8" or "StandardSingleStep"). The left textarea should now show your custom display template and the right textarea should show the new base display template.
- Look for your line changes and click on the left wiggly arrows to merge the lines from the base display template into your current display template (right to left). Merging code requires careful attention to details. Failure to understand what each line does may break the structure of the code. In this case, your goal is to preserve the code changes you made in the custom display template and merge in the new code structure from the new base display template.
- Save your custom display template and perform test.